Setting Up Your File Upload Link

Table of Contents
In Version 2.16, we added a new URL field to the Service File, which provides a public link for clients to upload their files - directly to their Service File! This is a free add-on, but requires deployment. You can request this additional feature by emailing support@myhomekeeper.org. This article walks you through how to set up the link once its been deployed.
Read All Setup and Administration Considerations
NOTE: To use this feature, you must be on Version 2.16 of HomeKeeper. Click here for the Release Notes, which include an overview of what's new and a link to upgrade.
Step One: Set up Your Experience Site
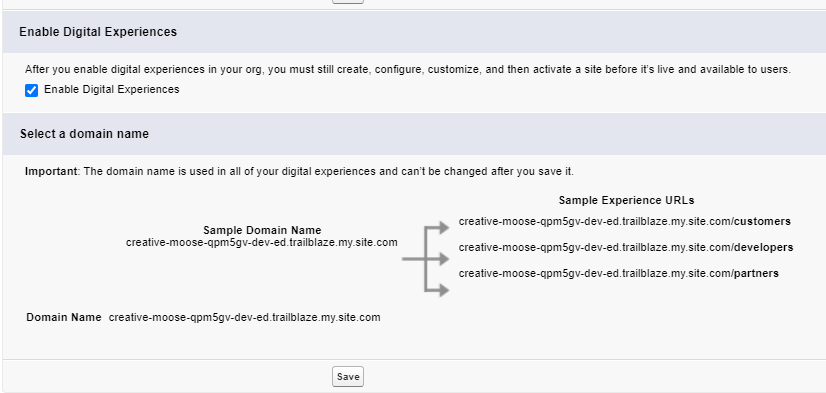
- From Setup, navigate to Feature Settings → Digital Experiences → Settings:

- In this menu, check the box that says ‘Enable Digital Experiences’ and then click ‘Save’.
- In your Setup navigation menu, you should now see ‘All Sites’ as an option under Digital Experiences. Click on it.

- Click ‘New’ to create your new Experience Site. This is the link that clients will go to to upload their files.

- It will bring you to a menu to select what theme you would like to have. It is really up to preference, but we typically use Build Your Own (Aura) for a clean layout.

- Click on your preferred Theme and ‘Get Started’. Enter a name and URL for your page and then click ‘Create’.

NOTE: From this page, click ‘Builder’ to edit your page's layout. Experience Sites are highly customizable. You can change the colors, spacing, and add a logo. Check out this article for instructions on how to edit your Experience Site.
Step Two: Add the File Upload Flow to your new Experience Cloud Site
- To add the File Upload flow, click the Lightning Bolt icon on the left-hand side of your screen to open the Components menu.

- Drag the Flow component onto the page.

- Click on the Flow Component to edit it. Clicking on it will open another menu to the righthand side of your screen.

- In the Flow box, type ‘file’ to bring up the File Upload Link flow.

- Select ‘HomeKeeper Online Application Template - Service File Upload File’. In the box that says recordId, type in {!recordId}.

- Click the X to close out of the Flow menu. Next, click the gear icon on the lefthand side to open Settings.

- In the Settings menu, check the box that says “Guest users can see and interact with the site without logging in”

- Click ‘Publish’ to finalize all changes.

Your Site is now live! You can access the public link, but Guest Users still cannot access the flow to submit their documents. The next section will cover how to finish granting them access.
Step Three: Grant Access to Guest Users
Update Profile for Experience Site Guest User
- From your Experience Site Builder → Settings → General, click on the Guest User profile (it will be called [Your Site Name] Profile).

- From the Profile editor, find the Flow Access menu.

- In this menu, click ‘Edit’. Then, ensure HomeKeeper Online Application Template - Service File Upload File is in the enabled box. Click ‘Save’.

- Click ‘Profile Overview’ to go back to the main Profile menu. Click ‘Assigned Users’.


- Click the Site Guest User's name.

- On the User menu, scroll down to Permission Set Assignments. Click ‘Edit Assignments’.

- Enable HomeKeeper Guest Permissions and click ‘Save’.

The Guest User is now fully configured, but there are a few more settings to allow the user to upload files.
Enable Sharing Settings
- In Setup, go to Salesforce Files -> General Settings. Turn on the setting that says ‘Allow site guest users to upload files’


- Next, in Setup go to Sharing Settings.

Scroll down to the bottom of the page to find the Sharing Rules for Service File. Click ‘New’.

- Set up your Sharing Rule with the following settings:


You must set some criteria for which Service Files are accessible. For example, you can filter by ‘Record Type’ = ‘Homeownership’ if you don't want 1-1 Counseling clients to be able to use the link. If anyone attempts to use the link for a Service File that does not meet the criteria, the upload will fail.
In this example, we set ‘Record Type’ = ‘Homeownership’ and ‘1-1 Counseling’, so that both record types can upload files.
Click ‘Save’ to finalize.
NOTE: Because of how simple this flow is, users will only have ‘Read’ access to the Service File referenced in the link. They will only be able to upload files to that Service File, not view or modify data. Unless the flow is modified to display data, this Sharing Rule does not expose information from your Service Files to the public.
Configure HomeKeeper Application Settings
- From Setup, navigate to Custom Settings.

- Click on ‘HomeKeeper Application Settings’ (the name, not ‘Manage’).

- Click ‘Manage’, then the top ‘New’ button.


- Check the box next to ‘Grant Guest Users Update Access’. Enter your Site's unique URL, including https:// at the beginning. Click ‘Save’.

The link is now fully functional! When you click on the Service File Upload Link URL on the Service File, it will bring you to the file upload flow. Any files uploaded, will then be saved to that Service File.
If you're not seeing the upload link, try viewing it in an incognito tab.


